python-parallel-programming
来源:
- Python并行编程 中文版 部分代码有改动
基于线程的并行
创建第一个线程
# example4.py
def function(i):
    print(f"i:{i}")

threads = []

for i in range(5):
    t = threading.Thread(target=function, args=(i,))
    threads.append(t)
    t.start()
    # t.join() 这个地方不能join,注意应把“启动”和“等待”分开,要不然串行化了

for t in threads:
    t.join()
使用列表展开式创建线程:
# example5.py
def function(i):
    time.sleep(1)
    print(f"i:{i}")

threads = [threading.Thread(target=function, args=(i,)) for i in range(5)]

for t in threads:
    t.start()

for t in threads:
    t.join()
自定义线程名
# example6.py
def first_function():
    print(threading.current_thread().name + "is starting")
    time.sleep(2)
    print(threading.current_thread().name + "is exiting")

def second_function():
    print(threading.current_thread().name + "is starting")
    time.sleep(2)
    print(threading.current_thread().name + "is exiting")

def third_function():
    print(threading.current_thread().name + "is starting")
    time.sleep(2)
    print(threading.current_thread().name + "is exiting")

if __name__ == "__main__":
    t1 = threading.Thread(target=first_function)
    t2 = threading.Thread(target=second_function)
    t3 = threading.Thread(name="custom_thread_name", target=third_function)

    t1.start()
    t2.start()
    t3.start()
    t1.join()
    t2.join()
    t3.join()
实现一个自定义线程类
# example7.py
class myThread(threading.Thread):
    def __init__(self, threadID, name):
        threading.Thread.__init__(self)
        self.threadID = threadID
        self.name = name

    def run(self):
        print("Starting " + self.name)
        time.sleep(1)
        print("Exiting " + self.name)


if __name__ == "__main__":
    t1 = myThread(1, "Thread-1")
    t2 = myThread(2, "Thread-2")
    t1.start()
    t2.start()
    t1.join()
    t2.join()
使用锁Lock实现线程同步
#example8.py
shared_resource_with_lock = 0
shared_resource_with_no_lock = 0
COUNT = 1000000
shared_resource_lock = threading.Lock()


# 有锁的情况
def increment_with_lock():
    global shared_resource_with_lock
    for i in range(COUNT):
        shared_resource_lock.acquire()
        shared_resource_with_lock += 1
        shared_resource_lock.release()


def decrement_with_lock():
    global shared_resource_with_lock
    for i in range(COUNT):
        shared_resource_lock.acquire()
        shared_resource_with_lock -= 1
        shared_resource_lock.release()


def increment_without_lock():
    global shared_resource_with_no_lock
    for _ in range(COUNT):
        v = shared_resource_with_no_lock  # 读
        v += 1  # 改
        shared_resource_with_no_lock = v  # 写


def decrement_without_lock():
    global shared_resource_with_no_lock
    for i in range(COUNT):
        shared_resource_with_no_lock -= 1


if __name__ == "__main__":
    t1 = threading.Thread(target=increment_with_lock)
    t2 = threading.Thread(target=decrement_with_lock)
    t3 = threading.Thread(target=increment_without_lock)
    t4 = threading.Thread(target=decrement_without_lock)
    t1.start()
    t2.start()
    t3.start()
    t4.start()
    t1.join()
    t2.join()
    t3.join()
    t4.join()
    print(
        "the value of shared variable with lock management is %s"
        % shared_resource_with_lock
    )
    print(
        "the value of shared variable with race condition is %s"
        % shared_resource_with_no_lock
    )
注意上面的无锁版本,运行时候看起来也是正确结果。这是因为 GIL(全局解释器锁)在“字节码调度”层面保护了 +=/-= 的原子性,导致两个线程交替执行 **一整条字节码 时几乎不会交错;于是即使不加锁,也大概率得到 0,看上去“没有竞态”。
-
x += 1在 Python 3.11 之前对应一条 字节码BINARY_ADD(或INPLACE_ADD),GIL 在同一时刻只允许一个线程完整执行一条字节码;
因此“读-改-写”被隐式地串行化了,竞态窗口极窄。 -
循环次数虽然大(1 亿),但每次循环仍然只触发一次字节码,所以交错概率低到在你的几次实验里没出现。
-
可以尝试把一条增量拆成多条字节码让竞态暴露,例如:
def increment_without_lock():
    global shared_resource_with_no_lock
    for _ in range(COUNT):
        v = shared_resource_with_no_lock   # 读
        v += 1                              # 改
        shared_resource_with_no_lock = v    # 写
关于 Python GIL
- Python 解释器的每个实例是一个进程。使用 multiprocessing 或 concurrent.futures 库可以启动额外的 Python 进程。Python 的 subprocess 库用于启动运行外部程序(不管使用何种语言编写)的进程。
- Python 解释器仅使用一个线程运行用户的程序和内存垃圾回收程序。使用 threading 或 concurrent.futures 库可以启动额外的 Python 线程。
- 对对象引用计数和解释器其他内部状态的访问受一个锁的控制,这个锁是“全局解释器锁”(Global Interpreter Lock,GIL)。任意时间点上只有一个 Python 线程可以持有 GIL。这意味着,任意时间点上只有一个线程能执行 Python 代码,与 CPU 核数量无关。
- 为了防止一个 Python 线程无限期持有 GIL,Python 的字节码解释器默认每 5 毫秒暂停当前 Python 线程 (这个时间间隔使用 sys.getswitchinterval() 获取,使用 sys.setswitchinterval(s) 设置),释放 GIL。被暂停的线程可以再次尝试获得 GIL,但是如果有其他线程等待,那么操作系统调度程序可能会从中挑选一个线程开展工作。
- 我们编写的 Python 代码无法控制 GIL。但是,耗时的任务可由内置函数或 C 语言(以及其他能在 Python/C API 层级接合的语言)扩展释放 GIL。
- Python 标准库中发起系统调用(系统调用指用户的代码调用操作系统内核的函数。I/O、计时器和锁都是通过系统调用获得的内核服务)的函数均可释放 GIL。这包括所有执行磁盘 I/O、网络 I/O 的函数,以及 time.sleep()。NumPy/SciPy 库中很多 CPU 密集型函数,以及 zlib 和 bz2 模块中执行压缩和解压操作的函数,也都释放 GIL。
- 在 Python/C API 层级集成的扩展也可以启动不受 GIL 影响的非 Python 线程。这些不受 GIL 影响的线程无法更改 Python 对象,但是可以读取或写入内存中支持缓冲协议的底层对象,例如 bytearray、array.array 和 NumPy 数组。
- GIL 对使用 Python 线程进行网络编程的影响相对较小,因为 I/O 函数释放 GIL,而且与内存读写相比,网络读写的延迟始终很高。各个单独的线程无论如何都要花费大量时间等待,所以线程可以交错执行,对整体吞吐量不会产生重大影响。正如 David Beazley 所言:“Python 线程非常擅长什么都不做。
- 对 GIL 的争用会降低计算密集型 Python 线程的速度。对于这类任务,在单线程中依序执行的代码更简单,速度也更快。
- 若想在多核上运行 CPU 密集型 Python 代码,必须使用多个 Python 进程。
以上关于Python GIL 的介绍来自《流畅的Python》一书。
使用可重入锁RLock实现线程同步
RLock叫做“Reentrant Lock”,即可以重复进入的锁,也叫做“递归锁”。 这种锁对比Lock有是三个特点: 1. 谁拿到谁释放。如果线程A拿到锁,线程B无法释放这个锁,只有A可以释放; 2. 同一线程可以多次拿到该锁,即可以acquire多次; 3. acquire多少次就必须release多少次,只有最后一次release才能改变RLock的状态为unlocked
# example9.py
class Box(object):
    lock = threading.RLock()

    def __init__(self):
        self.total_items = 0

    def execute(self, n):
        Box.lock.acquire()
        self.total_items += n
        Box.lock.release()

    def add(self):
        Box.lock.acquire()
        self.execute(1)
        Box.lock.release()

    def remove(self):
        Box.lock.acquire()
        self.execute(-1)
        Box.lock.release()


def adder(box, items):
    while items > 0:
        print("adding 1 item in the box")
        box.add()
        time.sleep(1)
        items -= 1


def remover(box, items):
    while items > 0:
        print("removing 1 item in the box")
        box.remove()
        time.sleep(1)
        items -= 1


if __name__ == "__main__":
    items = 5
    print("putting %s items in the box " % items)
    box = Box()
    t1 = threading.Thread(target=adder, args=(box, items))
    t2 = threading.Thread(target=remover, args=(box, items))
    t1.start()
    t2.start()

    t1.join()
    t2.join()
    print("%s items still remain in the box ", box.total_items)
使用信号量进行线程同步
信号量由E.Dijkstra发明并第一次应用在操作系统中,信号量是由操作系统管理的一种抽象数据类型,用于在多线程中同步对共享资源的使用。本质上说,信号量是一个内部数据,用于标明当前的共享资源可以有多少并发读取。
# example10.py
semaphore = threading.Semaphore(0)

def consumer():
    print("consumer is waitting.")
    semaphore.acquire()
    print("consumer consumed item number %s " % item)

def producer():
    global item
    time.sleep(10)
    item = random.randint(0, 1000)
    print("producer producted item number %s" % item)
    semaphore.release()

if __name__ == "__main__":
    for i in range(0, 5):
        t1 = threading.Thread(target=producer)
        t2 = threading.Thread(target=consumer)
        t1.start()
        t2.start()
        t1.join()
        t2.join()

    print("program terminated")
使用条件变量进行同步
条件变量是一种同步机制,其中某些线程在等待某一条件发生,其他的线程会在该条件发生的时候进行通知。一旦条件发生,线程会拿到共享资源的唯一权限。
#example11.py

items = []
condition = Condition()

class consumer(Thread):
    def __init__(self):
        Thread.__init__(self)

    def consume(self):
        global condition
        global items
        condition.acquire()
        while len(items) == 0:
            condition.wait() # wait会进入休眠,并释放锁,等待唤醒
        items.pop()
        print("consumer consumed 1 item")
        print("consumer consume items len:" + str(len(items)))
        condition.notify_all()
        condition.release()

    def run(self):
        for i in range(0, 20):
            time.sleep(2)
            self.consume()


class producer(Thread):

    def __init__(self):
        Thread.__init__(self)

    def produce(self):
        global condition
        global items
        condition.acquire()
        while len(items) == 10:
            condition.wait()  # 内部先解锁 → 挂起 → 被唤醒后重新加锁
            print("producer producted are " + str(len(items)))

        items.append(1)
        print("producer items producted " + str(len(items)))
        condition.notify_all()
        condition.release()

    def run(self):
        for i in range(0, 20):
            time.sleep(1)
            self.produce()

if __name__ == "__main__":
    producer = producer()
    consumer = consumer()
    producer.start()
    consumer.start()
    producer.join()
    consumer.join()
虚假唤醒
条件变量规范就是:“先测条件,再决定等待;被唤醒后,再测条件。” 使用while是正确的,若改成if是有问题的。
# 消费者
while len(items) == 0:
    condition.wait() # wait会进入休眠,并释放锁,等待唤醒

# 生产者
while len(items) == 10:
    condition.wait()  # 内部先解锁 → 挂起 → 被唤醒后重新加锁
    print("producer producted are " + str(len(items)))
我们可以从下面时序场景来考虑:
- 线程 A:拿到锁 → 发现队列空 → wait() 睡眠(释放锁)
- 线程 B:拿到锁 → 往队列放 1 条数据 → notify_all()
- 线程 C:也被 notify_all() 唤醒 → 抢在 A 之前拿到锁(此时A阻塞在锁竞争上) → 把那条数据消费掉 → 释放锁
- 线程 A:终于拿到锁从 wait() 返回 → 队列又空了!
从上面可以看到必须使用到while,从而避免了虚假唤醒(唤醒了,但没有数据可以消费了)问题。
唤醒丢失
还有一点需要注意的是,唤醒时候使用的notify_all而不是notify,这是为了避免唤醒丢失(队列有数据,却没有唤醒任何一个消费者去消费)问题。考虑下面场景:
- 线程 A:拿到锁 → 发现队列空 → wait() 睡眠(释放锁)
- 线程 B:拿到锁 → 往队列放 1 条数据 → notify()
- 线程 A:被 notify() 唤醒 ,但还未拿到锁
- 线程 C: 抢在 A 之前拿到锁,往队列放 1 条数据 → notify()
- 线程 A:终于拿到锁了 → 把B的那条数据消费掉 → 释放锁 → 但队列里面还有一条C放入数据没有消费者去消费!
对于队列场景一律用 notify_all(),生产者可能一次 put_list(items) 放入 N 条,若只 notify() 一次, 结果只有 1 个线程被唤醒,剩下 N-1 条数据无人消费,吞吐量骤降。此外多唤醒几个线程看似浪费上下文切换,但:
- 它们终究要抢同一把锁,只有一个能真正进入临界区;
- 在现代调度器里,多余唤醒的成本远低于“任务饥饿”或“轮询补偿”带来的延迟。
使用with管理同步对象
使用 with 语法可以在特定的地方分配和释放资源,因此, with 语法也叫做“上下文管理器”。在threading模块中,所有带有 acquire() 方法和 release() 方法的对象都可以使用上下文管理器。
#example12.py
logging.basicConfig(level=logging.DEBUG, format="(%(threadName)-10s) %(message)s")

def threading_with(statement):
    with statement:
        logging.debug("%s acquired via with" % statement)


def threading_not_with(statement):
    statement.acquire()
    try:
        logging.debug("%s acquired directly" % statement)
    finally:
        statement.release()


if __name__ == "__main__":
    lock = threading.Lock()
    rlock = threading.RLock()
    condition = threading.Condition()
    mutex = threading.Semaphore(1)
    threading_synchronization_list = [lock, rlock, condition, mutex]

    for statement in threading_synchronization_list:
        t1 = threading.Thread(target=threading_with, args=(statement,))
        t2 = threading.Thread(target=threading_not_with, args=(statement,))
        t1.start()
        t2.start()
        t1.join()
        t2.join()
使用队列Queue进行线程通信
Queue常用的方法有以下四个:
- put(): 往queue中放一个item
- get(): 从queue删除一个item,并返回删除的这个item
- task_done(): 每次item被处理的时候需要调用这个方法
- join(): 所有item都被处理之前一直阻塞
# example13.py
class producer(Thread):
    def __init__(self, queue: Queue):
        Thread.__init__(self)
        self.queue = queue

    def run(self):
        for i in range(10):
            item = random.randint(0, 256)
            self.queue.put(item)
            print(
                "Producer notify: item %d appended to queue by %s" % (item, self.name)
            )
            time.sleep(1)


class consumer(Thread):
    def __init__(self, queue: Queue):
        Thread.__init__(self)
        self.queue = queue

    def run(self):
        while True:
            item = self.queue.get()
            print("Consumer notify: %d popped from queue by %s" % (item, self.name))
            self.queue.task_done()


if __name__ == "__main__":
    queue = Queue()
    t1 = producer(queue)
    t2 = consumer(queue)
    t3 = consumer(queue)
    t4 = consumer(queue)

    t1.start()
    t2.start()
    t3.start()
    t4.start()

    t1.join()
    t2.join()
    t3.join()
    t4.join()
上面示例中,当生产者发布完所有消息后,消费者却一直永远等待新的消息进来,如果想让消费者尽早完成任务,我们可以使用“毒丸”模式。
# example14.py
POISON = object()  # 全局唯一的结束标记

class Producer(Thread):
    def __init__(self, queue: Queue, pill: object):
        super().__init__()
        self.queue = queue
        self.pill = pill

    def run(self):
        for _ in range(10):
            item = random.randint(0, 256)
            self.queue.put(item)
            print(f"Producer notify: item {item} appended by {self.name}")
            time.sleep(1)

        # 生产结束,发放毒丸
        for _ in range(N_CONSUMERS):  # 有多少消费者就发多少粒
            self.queue.put(self.pill)
        print("Producer finished.")

class Consumer(Thread):
    def __init__(self, queue: Queue, pill: object):
        super().__init__()
        self.queue = queue
        self.pill = pill

    def run(self):
        while True:
            item = self.queue.get()
            if item is self.pill:  # 遇到毒丸就自杀
                print(f"{self.name} received poison pill and exits.")
                self.queue.task_done()
                break
            print(f"Consumer notify: {item} popped by {self.name}")
            self.queue.task_done()


if __name__ == "__main__":
    N_CONSUMERS = 3
    q = Queue()
    producers = [Producer(q, POISON)]
    consumers = [Consumer(q, POISON) for _ in range(N_CONSUMERS)]

    for t in producers + consumers:
        t.start()

    # 等生产者先结束
    for p in producers:
        p.join()

    # 等队列里所有任务(包括毒丸)被处理完
    q.join()

    # 此时所有消费者已收到毒丸并退出,主线程再 join 它们
    for c in consumers:
        t.join()

    print("All done.")
基于进程的并行
创建第一个进程
#example15.py
def foo(i):
    print("Called function in process: %s" % i)
    return

if __name__ == "__main__":
    for i in range(5):
        p = multiprocessing.Process(target=foo, args=(i,))
        p.start()
        p.join()
注意进程相关代码应该放在__main__下面或者单独的一个文件里面,要不然执行进程时候会出现无限递归。
指定进程名称
#example16.py
def foo():
    name = multiprocessing.current_process().name
    print("Starting %s \n" % name)
    time.sleep(3)
    print("Exiting %s \n", name)


if __name__ == "__main__":
    process_with_name = multiprocessing.Process(name="foo_process", target=foo)
    process_with_default_name = multiprocessing.Process(target=foo)
    process_with_name.start()
    process_with_default_name.start()
    process_with_name.join()
    process_with_default_name.join()
后台运行进程
#example17.py
def foo():
    name = multiprocessing.current_process().name
    print("Starting %s" % name)
    time.sleep(15)
    print("Exiting %s" % name)


if __name__ == "__main__":
    background_process = multiprocessing.Process(name="background_process", target=foo)
    background_process.daemon = True
    no_background_process = multiprocessing.Process(
        name="no_background_process", target=foo
    )
    no_background_process.daemon = False
    background_process.start()
    no_background_process.start()
杀掉一个进程
#example18.py
def foo():
    print("Start function")
    time.sleep(0.1)
    print("Finished function")


if __name__ == "__main__":
    p = multiprocessing.Process(target=foo)
    print("Process before execution: ", p, p.is_alive())
    p.start()
    print("Process running: ", p, p.is_alive())
    p.terminate()
    print("Process terminated: ", p, p.is_alive())
    p.join()
    print("Process joined: ", p, p.is_alive())
    print("Process exit code: ", p.exitcode)
自定义一个进程类
#example19.py
class MyProcess(multiprocessing.Process):
    def run(self):
        print("called run method in process: %s" % self.name)
        return


if __name__ == "__main__":
    jobs = []
    for i in range(5):
        p = MyProcess()
        jobs.append(p)
        p.start()
        p.join()
使用队列Queue实现进程间通信
#example20.py
class Producer(multiprocessing.Process):
    def __init__(self, queue: multiprocessing.Queue):
        multiprocessing.Process.__init__(self)
        self.queue = queue

    def run(self):
        for i in range(10):
            item = random.randint(0, 256)
            self.queue.put(item)
            print("process Producer: item %d appended to queue %s" % (item, self.name))
            time.sleep(1)
            print("The size of queue is %s" % self.queue.qsize())


class Consumer(multiprocessing.Process):
    def __init__(self, queue: multiprocessing.Queue):
        multiprocessing.Process.__init__(self)
        self.queue = queue

    def run(self):
        while True:
            if self.queue.empty():
                print("the queue is empty")
                break
            else:
                time.sleep(2)
                item = self.queue.get()
                print(
                    "process consumer: item %d popped from by %s\n" % (item, self.name)
                )
                time.sleep(1)


if __name__ == "__main__":
    queue = multiprocessing.Queue()
    process_producer = Producer(queue)
    process_consumer = Consumer(queue)
    process_producer.start()
    time.sleep(10)
    process_consumer.start()
    process_producer.join()
    process_consumer.join()
使用管道实现进程间通信
#example21.py
def create_items(pipe):
    output_pipe, _ = pipe
    for item in range(10):
        output_pipe.send(item)

    output_pipe.close()


def multiply_items(pipe_1, pipe_2):
    close, input_pipe = pipe_1
    close.close()
    output_pipe, _ = pipe_2
    try:
        while True:
            item = input_pipe.recv()
            output_pipe.send(item * item)
    except EOFError:
        output_pipe.close()


if __name__ == "__main__":
    pipe_1 = multiprocessing.Pipe(True)
    process_pipe_1 = multiprocessing.Process(target=create_items, args=(pipe_1,))
    process_pipe_1.start()

    pipe_2 = multiprocessing.Pipe(True)
    process_pipe_2 = multiprocessing.Process(
        target=multiply_items, args=(pipe_1, pipe_2)
    )
    process_pipe_2.start()
    pipe_1[0].close()
    pipe_2[0].close()

    try:
        while True:
            print(pipe_2[1].recv())
    except EOFError:
        print("end")
使用Barrier栅栏实现进程同步执行
多个进程可以协同工作来完成一项任务。通常需要共享数据。所以在多进程之间保持数据的一致性就很重要了。需要共享数据协同的进程必须以适当的策略来读写数据。相关的同步原语和线程的库很类似。
进程的同步原语如下:
- Lock: 这个对象可以有两种装填:锁住的(locked)和没锁住的(unlocked)。一个Lock对象有两个方法, acquire() 和 release() ,来控制共享数据的读写权限。
- Event: 实现了进程间的简单通讯,一个进程发事件的信号,另一个进程等待事件的信号。 Event 对象有两个方法, set() 和 clear() ,来管理自己内部的变量。
- Condition: 此对象用来同步部分工作流程,在并行的进程中,有两个基本的方法: wait() 用来等待进程, notify_all() 用来通知所有等待此条件的进程。
- Semaphore: 用来共享资源,例如,支持固定数量的共享连接。
- Rlock: 递归锁对象。其用途和方法同 Threading 模块一样。
- Barrier: 将程序分成几个阶段,适用于有些进程必须在某些特定进程之后执行。处于障碍(Barrier)之后的代码不能同处于障碍之前的代码并行。
multiprocessing.Lock 能做到跨进程同步,是因为它根本不是普通线程锁,而是内核级同步原语(通常由操作系统提供)。在 Linux/ macOS 下对应 匿名 POSIX 信号量或互斥量(sem_init / pthread_mutexattr_setpshared 并设置 PTHREAD_PROCESS_SHARED)。 这些对象的名字或句柄可以在不同进程地址空间里被“打开”或“映射”,因此能实现跨进程可见。
注意:上面提到的队列Queue和管道Pipe不是同步原语,它们只是传递消息的、通信的机制,是无法保证数据的一致性的。它们底层用到了同步原语。
#example22.py
import multiprocessing
from multiprocessing import Barrier, Lock, Process
from time import time, sleep
from datetime import datetime
import random


def test_with_barrier(synchronizer, serializer):
    sleep(random.randint(1, 10))
    name = multiprocessing.current_process().name
    synchronizer.wait()
    now = time()
    with serializer:
        print("process %s ----> %s" % (name, datetime.fromtimestamp(now)))


def test_without_barrier():
    sleep(random.randint(1, 10))
    name = multiprocessing.current_process().name
    now = time()
    print("process %s ----> %s" % (name, datetime.fromtimestamp(now)))


if __name__ == "__main__":
    synchronizer = Barrier(2)
    serializer = Lock()
    Process(
        name="p1 - test_with_barrier",
        target=test_with_barrier,
        args=(synchronizer, serializer),
    ).start()
    Process(
        name="p2 - test_with_barrier",
        target=test_with_barrier,
        args=(synchronizer, serializer),
    ).start()
    Process(name="p3 - test_without_barrier", target=test_without_barrier).start()
    Process(name="p4 - test_without_barrier", target=test_without_barrier).start()
进程之间的状态管理
Python的多进程模块提供了在所有的用户间管理共享信息的管理者(Manager)。一个管理者对象控制着持有Python对象的服务进程,并允许其它进程操作共享对象。
管理者有以下特性: - 它控制着管理共享对象的服务进程 - 它确保当某一进程修改了共享对象之后,所有的进程拿到额共享对象都得到了更新
#example23.py
def worker(dictionary, key, item):
    dictionary[key] = item
    print(
        "process = %s, key = %d value = %d"
        % (multiprocessing.current_process().name, key, item)
    )

if __name__ == "__main__":
    mgr = multiprocessing.Manager()
    dictionary = mgr.dict() # 进程之间共享的状态信息
    jobs = [
        multiprocessing.Process(target=worker, args=(dictionary, i, i * i))
        for i in range(0, 5)
    ]

    for j in jobs:
        j.start()

    for j in jobs:
        j.join()

    print("results: ", dictionary)
使用进程池
多进程库提供了 Pool 类来实现简单的多进程任务。 Pool 类有以下方法:
- apply(): 直到得到结果之前一直阻塞。
- apply_async(): 这是 apply() 方法的一个变体,返回的是一个result对象。这是一个异步的操作,在所有的子类执行之前不会锁住主进程。
- map(): 这是内置的 map() 函数的并行版本。在得到结果之前一直阻塞,此方法将可迭代的数据的每一个元素作为进程池的一个任务来执行。
- map_async(): 这是 map() 方法的一个变体,返回一个result对象。如果指定了回调函数,回调函数应该是callable的,并且只接受一个参数。当result准备好时会自动调用回调函数(除非调用失败)。回调函数应该立即完成,否则,持有result的进程将被阻塞。
#example24.py

def function_square(data):
    result = data * data
    return result

if __name__ == "__main__":
    inputs = list(range(100))
    pool = multiprocessing.Pool(processes=4)
    pool_outputs = pool.map(function_square, inputs)
    pool.close()
    pool.join()

    print("Pool :", pool_outputs)
异步编程
基于 concurrent.futures 模块进行异步编程
Python3.2带来了 concurrent.futures 模块,这个模块具有线程池和进程池、管理并行编程任务、处理非确定性的执行流程、进程/线程同步等功能。
此模块由以下部分组成:
- concurrent.futures.Executor: 这是一个虚拟基类,提供了异步执行的方法。
- submit(function, argument): 调度函数(可调用的对象)的执行,将 argument 作为参数传入。
- map(function, argument): 将 argument 作为参数执行函数,以 异步 的方式。
- shutdown(Wait=True): 发出让执行者释放所有资源的信号。
- concurrent.futures.Future: 其中包括函数的异步执行。Future对象是submit任务(即带有参数的functions)到executor的实例。
Executor是抽象类,可以通过子类访问,即线程或进程的 ExecutorPools 。因为,线程或进程的实例是依赖于资源的任务,所以最好以“池”的形式将他们组织在一起,作为可以重用的launcher或executor。
current.Futures 模块提供了两种 Executor 的子类,各自独立操作一个线程池和一个进程池。这两个子类分别是:
- concurrent.futures.ThreadPoolExecutor(max_workers)
- concurrent.futures.ProcessPoolExecutor(max_workers)
max_workers 参数表示最多有多少个worker并行执行任务。
#example25.py
number_list = [1, 2, 3, 4, 5, 6, 7, 8, 9, 10]


def evaluate_item(x):
    result_item = count(x)
    return result_item


def count(number):
    for i in range(0, 10000000):
        i = i + 1
    return i * number


if __name__ == "__main__":
    # 顺序执行
    start_time = time.time()
    for item in number_list:
        print(evaluate_item(item))

    print("Sequential execution in " + str(time.time() - start_time), "seconds")
    # 线程池执行
    start_time_1 = time.time()
    with concurrent.futures.ThreadPoolExecutor(max_workers=5) as executor:
        futures = [executor.submit(evaluate_item, item) for item in number_list]

        for future in concurrent.futures.as_completed(futures):
            print(future.result())
    print("Thread pool execution in " + str(time.time() - start_time_1), "seconds")

    # 进程池执行
    start_time_2 = time.time()
    with concurrent.futures.ProcessPoolExecutor(max_workers=5) as executor:
        futures = [executor.submit(evaluate_item, item) for item in number_list]
        [print(future.result()) for future in concurrent.futures.as_completed(futures)]

    print("Process pool execution in " + str(time.time() - start_time_2), "seconds")
注意:由于GIL的存在,基于线程池实现的异步和顺序执行的耗时是差不多的。
使用Asyncio管理事件循环
Python的Asyncio模块提供了管理事件、协程、任务和线程的方法,以及编写并发代码的原语。此模块的主要组件和概念包括:
- 事件循环: 在Asyncio模块中,每一个进程都有一个事件循环。
- 协程: 这是子程序的泛化概念。协程可以在执行期间暂停,这样就可以等待外部的处理(例如IO)完成之后,从之前暂停的地方恢复执行。
- Futures: 定义了 Future 对象,和 concurrent.futures 模块一样,表示尚未完成的计算。
- Tasks: 这是Asyncio的子类,用于封装和管理并行模式下的协程。
Asyncio提供了一下方法来管理事件循环:
- l~~oop = get_event_loop(): 得到当前上下文的事件循环。~~
- loop.call_later(time_delay, callback, argument): 延后 time_delay 秒再执行 callback 方法。
- loop.call_soon(callback, argument): 尽可能快调用 callback, call_soon() 函数结束,主线程回到事件循环之后就会马上调用 callback 。
- loop.time(): 以float类型返回当前时间循环的内部时间。
- asyncio.set_event_loop(): 为当前上下文设置事件循环。
- asyncio.new_event_loop(): 根据此策略创建一个新的时间循环并返回。
- loop.run_forever(): 在调用 stop() 之前将一直运行。
注意:asyncio.get_event_loop() 在主线程没有正在运行的事件循环时,会自动新建一个并返回;但 Python 3.10 起这种行为被标为 deprecated,会抛出:DeprecationWarning: There is no current event loop。get_event_loop() 为了兼容旧代码,会隐式地 new_event_loop() → set_event_loop(),再返回;从 3.10 开始官方不再鼓励这种“隐式创建”,所以给出警告。
官方推荐写法(Python 3.7+ 通用):
若确实需要“拿到循环对象”再手工调度,可以显式创建:
loop = asyncio.new_event_loop()   # 显式新建
asyncio.set_event_loop(loop)      # 设成当前线程的“当前循环”
try:
    loop.run_until_complete(main())
finally:
    loop.close()
示例:
#example26.py
def function_1(end_time, loop):
    print("function_1 called")
    if (loop.time() + 1.0) < end_time:
        loop.call_later(1, function_2, end_time, loop)
    else:
        loop.stop()


def function_2(end_time, loop):
    print("function_2 called")
    if (loop.time() + 1.0) < end_time:
        loop.call_later(1, function_3, end_time, loop)
    else:
        loop.stop()


def function_3(end_time, loop):
    print("function_3 called")
    if (loop.time() + 1.0) < end_time:
        loop.call_later(1, function_4, end_time, loop)
    else:
        loop.stop()


def function_4(end_time, loop):
    print("function_4 called")
    if (loop.time() + 1.0) < end_time:
        loop.call_later(1, function_4, end_time, loop)
    else:
        loop.stop()


if __name__ == "__main__":
    # loop = asyncio.get_event_loop()
    loop = asyncio.new_event_loop()
    asyncio.set_event_loop(loop)
    end_loop = loop.time() + 9.0
    loop.call_soon(function_1, end_loop, loop)
    loop.run_forever()
    loop.close()
使用Asyncio的协程来模拟有限状态机
有限状态机(finite state machine or automaton, FSA)是一个数学模型,不仅在工程领域应用广泛,在科学领域也很著名,例如数学和计算机科学等。我们要模拟的状态机如下图所示:
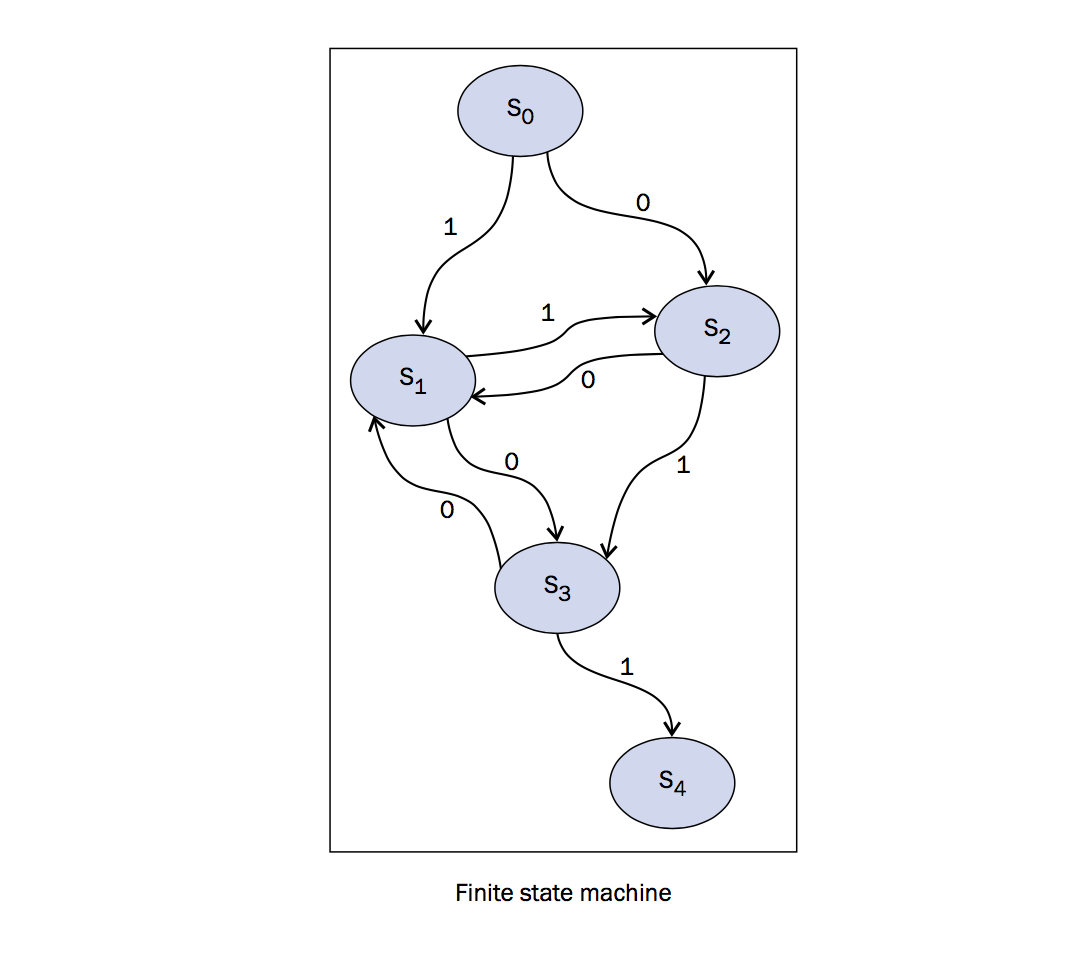
在上图中,可以看到我们的系统有 S1, S2, S3, S4 四个状态, 0 和 1 是状态机可以从一个状态到另一个状态的值(这个过程叫做转换)。例如在本实验中,只有当只为1的时候, S0 可以转换到 S1 ,当只为0的时候, S0 可以转换到 S2 .Python代码如下,状态模拟从 S0 开始,叫做 初始状态 ,最后到 S4 ,叫做 结束状态 。
#example27.py
import asyncio
import time
from random import randint


async def StartState():
    print("Start State called \n")
    input_value = randint(0, 1)
    time.sleep(1)
    if input_value == 0:
        result = await State2(input_value)
    else:
        result = await State1(input_value)
    print("Resume of the Transition : \nStart State calling " + result)


async def State1(transition_value):
    outputValue = str("State 1 with transition value = %s \n" % transition_value)
    input_value = randint(0, 1)
    time.sleep(1)
    print("...Evaluating...")
    if input_value == 0:
        result = await State3(input_value)
    else:
        result = await State2(input_value)
    result = "State 1 calling " + result
    return outputValue + str(result)


async def State1(transition_value):
    outputValue = str("State1 with transition value = %s \n" % transition_value)
    input_value = randint(0, 1)
    time.sleep(1)
    print("...Evaluating...")
    if input_value == 0:
        result = await State3(input_value)
    else:
        result = await State2(input_value)
    result = "State 1 calling " + result

    return outputValue + str(result)


async def State2(transition_value):
    outputValue = str("State 2 with transition value = %s \n" % transition_value)
    input_value = randint(0, 1)
    time.sleep(1)
    print("...Evaluating...")
    if input_value == 0:
        result = await State1(input_value)
    else:
        result = await State3(input_value)
    result = "State 2 calling " + result
    return outputValue + str(result)


async def State3(transition_value):
    outputValue = str("State 3 with transition value = %s \n" % transition_value)
    input_value = randint(0, 1)
    time.sleep(1)
    print("...Evaluating...")
    if input_value == 0:
        result = await State1(input_value)
    else:
        result = await EndState(input_value)
    result = "State 3 calling " + result
    return outputValue + str(result)


async def EndState(transition_value):
    outputValue = str("End State with transition value = %s \n" % transition_value)
    print("...Stop Computation...")
    return outputValue


if __name__ == "__main__":
    print("Finite State Machine simulation with Asyncio Coroutine")
    # loop = asyncio.get_event_loop()
    asyncio.run(StartState())
注意:原教程中的@asyncio.coroutine 在 Python 3.8 被正式标为废弃,并在 Python 3.11 被彻底移除。现在写异步协程请直接用原生协程函数:
下面的旧写法已失效:
使用自定义循环对象
#example28.py


async def factorial(number):
    f = 1
    for i in range(2, number + 1):
        print("Asyncio.Task: Compute factorial(%s)" % (i))
        await asyncio.sleep(1)
        f *= i
    print("Asyncio.Task - factorial(%s) = %s" % (number, f))


async def fibonacci(number):
    a, b = 0, 1
    for i in range(number):
        print("Asyncio.Task: Compute fibonacci (%s)" % (i))
        await asyncio.sleep(1)
        a, b = b, a + b
    print("Asyncio.Task - fibonacci(%s) = %s" % (number, a))


async def binomialCoeff(n, k):
    result = 1
    for i in range(1, k + 1):
        result = result * (n - i + 1) / i
        print("Asyncio.Task: Compute binomialCoeff (%s)" % (i))
        await asyncio.sleep(1)
    print("Asyncio.Task - binomialCoeff(%s , %s) = %s" % (n, k, result))


async def main():
    tasks = [
        asyncio.create_task(factorial(10)),
        asyncio.create_task(fibonacci(10)),
        asyncio.create_task(binomialCoeff(20, 10)),
    ]

    await asyncio.wait(tasks)


if __name__ == "__main__":
    loop = asyncio.new_event_loop()
    asyncio.set_event_loop(loop)
    loop.run_until_complete(main())
    loop.close()
最简单的一个版本:
import asyncio

async def job(n):
    await asyncio.sleep(n)
    return f'done {n}'

async def main():
    tasks = [asyncio.create_task(job(i)) for i in range(1, 4)]
    # 使用 wait 等待全部完成
    done, pending = await asyncio.wait(tasks)
    for t in done:
        print(t.result())

if __name__ == '__main__':
    loop = asyncio.new_event_loop()   # 1. 手动新建
    asyncio.set_event_loop(loop)      # 2. 设为当前循环
    try:
        loop.run_until_complete(main())  # 3. 驱动协程
    finally:
        loop.close()
使用裸 asyncio.Future
def mark_done(fut: asyncio.Future) -> None:
    """由‘外部回调’在 2 秒后给 future 设置结果"""
    time.sleep(2)
    fut.set_result("Future is done!")


async def main():
    loop = asyncio.get_running_loop()

    # 1. 创建一个裸 Future
    fut = loop.create_future()  # 等价于 asyncio.Future(loop=loop)

    # 2. 启动一个线程去“模拟外部事件”完成 Future
    #    (真实场景里可以是网络库、文件监听等回调)
    loop.run_in_executor(None, mark_done, fut)

    # 3. 在这里挂起,直到 Future 被 set_result
    print("awaiting future...")
    result = await fut  # 挂起点
    print("got result:", result)


if __name__ == "__main__":
    asyncio.run(main())
流式获取与一次性获取 Future 列表结果
获取future结果方法有:
- concurrent.futures.as_completed: 它返回一个生成器,哪个 Future 先完成就先 yield 哪个,不必等全部结束,从而“流式”获取 Future 列表结果。它可以一边生产一边 submit,把新 Future 也塞进 as_completed 的集合里即可:
- concurrent.futures.wait: 用于等 全部 Future 完成再一次性取结果:
- executor.map: map 内部会等所有任务结束才一次性返回:
#example30.py
from concurrent.futures import ThreadPoolExecutor, as_completed, wait
import time


def job(x):
    time.sleep(x)
    return x * x


if __name__ == "__main__":
    # 流式获取feture结果
    with ThreadPoolExecutor(max_workers=4) as executor:
        futures = [executor.submit(job, i) for i in range(1, 6)]  # 1~5 秒的任务

        for fut in as_completed(futures):  # 先完成先返回
            print("got result:", fut.result())

    # 使用wait一次获取所有结果
    with ThreadPoolExecutor(max_workers=4) as executor:
        futures = [executor.submit(job, i) for i in range(5)]

        # 阻塞到全部完成
        wait(futures, timeout=10)  # 返回 (done, not_done) 二元组,这里忽略

        # 再按原始顺序拿结果
        results = [f.result() for f in futures]
        print(results)

    # 使用map一次性获取所有结果
    with ThreadPoolExecutor(max_workers=4) as executor:
        results = list(executor.map(job, range(5)))  # 阻塞直到全部完成
        print(results)